Introduction
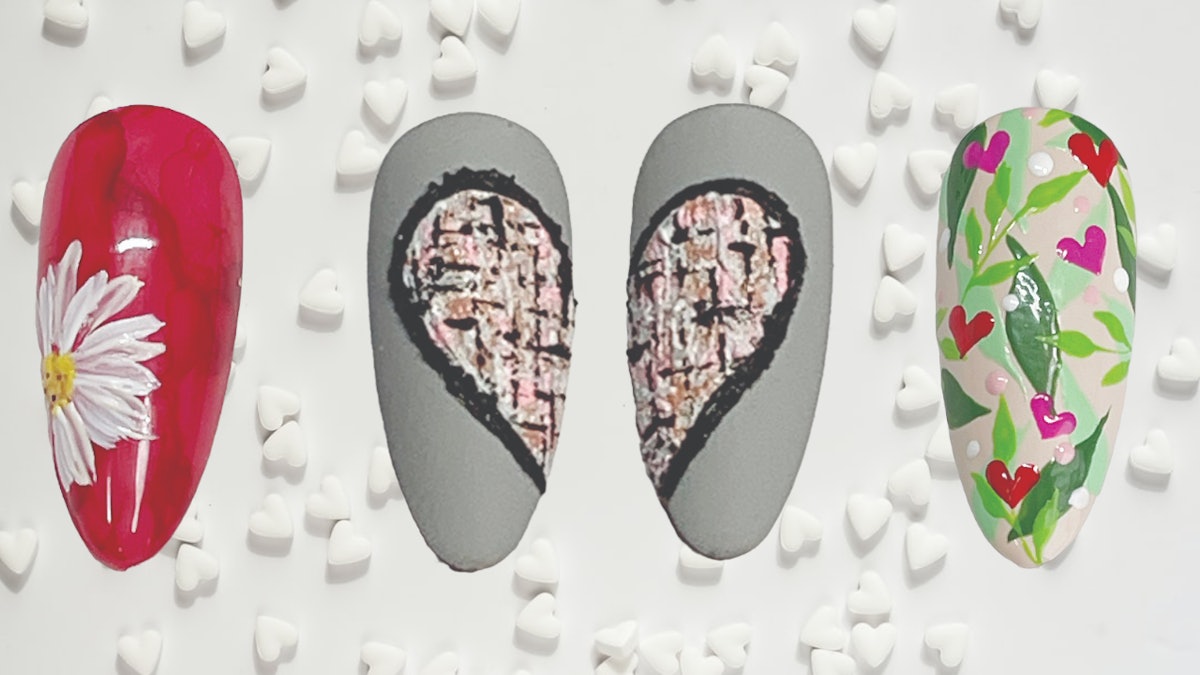
Valentine’s Day is just around the corner, and it’s the perfect time to showcase your creativity and skills through stunning nail art. Whether your clients are looking for something elegant or playful, these three Valentine’s Day nail designs by renowned nail artist Lauren Hoehn (@inspobynails) will surely impress. Let’s dive into these detailed tutorials that anyone can recreate!
Marbled Flower Nail Design
This beautiful marbled flower design brings a touch of elegance while incorporating the romantic essence of Valentine’s Day.
Materials Needed:
- Light pink or nude nail polish
- Matte top coat
- Similar colored ink
- Acetone-dipped brush
- No-wipe gel paint
- Yellow gel paint
Step-by-Step Instructions:
- Begin by applying two coats of your chosen light pink or nude polish for a base. Make sure it’s fully dry and then follow up with a matte top coat.
- Next, wipe a similar colored ink across the surface of the nail. Wait until it’s completely dry to prevent smudging.
- Using an acetone-dipped brush, manipulate the ink to form a marbled pattern. Be gentle with your strokes to achieve a beautiful blend.
- Once satisfied with the marbling, protect the design by adding a layer of top coat.
- Now, it’s time to bring your flower to life! Use no-wipe gel paint to paint petals on the nail, then cure the design under a UV light.
- Repeat the petal painting process until you expect a fuller flower design.
- Finish off your flower design by dotting yellow gel paint in the center and sealing it all with your favorite top coat.
I Heart You, Now Leave
This fun and whimsical nail design combines vibrant colors and love hearts, perfect for the Valentine’s season.
Materials Needed:
- Light pink or nude nail polish
- Fine liner brush
- Light green gel paint
- Darker green gel paint
- Mid-tone green gel paint
- Pink and red gel paint
- Lighter pink and white gel paint
Step-by-Step Instructions:
- Start by applying two coats of light pink or nude polish for a clean base.
- Using a fine liner brush and light green gel paint, paint leaves onto the nails, then cure them.
- Once cured, use a darker green gel paint to add another layer of leaves, giving depth to your design.
- Add mid-tone green leaves to enhance the visual interest across the nails.
- Now, using pink and red gel paint, dot on little circles in pairs along the leaves and connect them to form charming tiny hearts!
- For an additional playful touch, dot on lighter pink and white dots randomly across the design and finish with your desired top coat.
Pink Tweed Broken Heart
The Pink Tweed Broken Heart design is chic and trendy, perfect for those looking to make a statement this Valentine’s Day.
Materials Needed:
- White nail polish
- White texture art gel
- Light peach gel paint
- Light pink gel paint
- Fine liner brush
Step-by-Step Instructions:
- Start with a clean white base on two of your chosen nails, ensuring a solid foundation for the designs.
- Using gel paint, outline the two sides of a heart on the nails. Fill in the heart shape using the white texture art gel and cure under a UV light for 60 seconds.
- Once cured, apply fine light peach lines inside the heart for added texture.
- Follow up with light pink lines to create contrast and depth in the design.
- Using a fine liner brush, sketch thin black lines inside the heart for more texture and detail.
- As a final touch to your design, outline the heart in black for a striking finish.
Conclusion
These three Valentine’s Day nail designs are not only visually stunning but also perfectly themed for the celebration of love. Using the easy-to-follow tutorials from Lauren Hoehn, you can create beautiful nail art that your clients will adore. Whether you choose to recreate the marbled flower, the playful hearts, or the chic pink tweed broken heart, these designs are sure to leave a lasting impression! Happy nail designing!


