Introduction to Y2K Butterfly Nails
The Y2K aesthetic has made a grand return, captivating fashion enthusiasts and trendsetters alike. Among the many playful motifs that characterize this nostalgic era, the butterfly stands out as a favorite. Not only do these vibrant creatures symbolize transformation and beauty, but they also make for stunning nail art. If you’re looking to elevate your nail game this spring, Y2K butterfly nails are the way to go!
Why Choose Y2K Butterfly Nails?
As the weather warms up, vibrant colors and whimsical designs become increasingly popular. The butterfly design fits perfectly with floral themes and soft, pastel palettes associated with the season. Moreover, this nail art trend allows for a variety of interpretations, from subtle to bold styles, making it suitable for everyone.
Meet Milli Mac: Nail Artist Extraordinaire
Leading the charge in this nail revolution is Milli Mac, a talented nail technician and co-owner of Pink Promise Nail Studio in Birmingham, England. Milli specializes in BIAB (Builder in a Bottle) and hand-painted nail designs. You can follow her on Instagram at @by_millimac to explore her creative works and stay up to date with her latest nail art inspirations.
Step-by-Step Tutorial for Butterfly Nail Art
Materials Needed:
- Base coat
- P pastel purple nail polish (or any preferred color)
- Sheer iridescent chrome powder
- Thick black and white gel polish
- Top coat
- Nail art tools (brushes, dotting tools, etc.)
Instructions:
- Prep the Nails: Begin by prepping your client’s nails and infilling any existing BIAB overlay. Proper nail prep is crucial to ensure the longevity of your nail art.
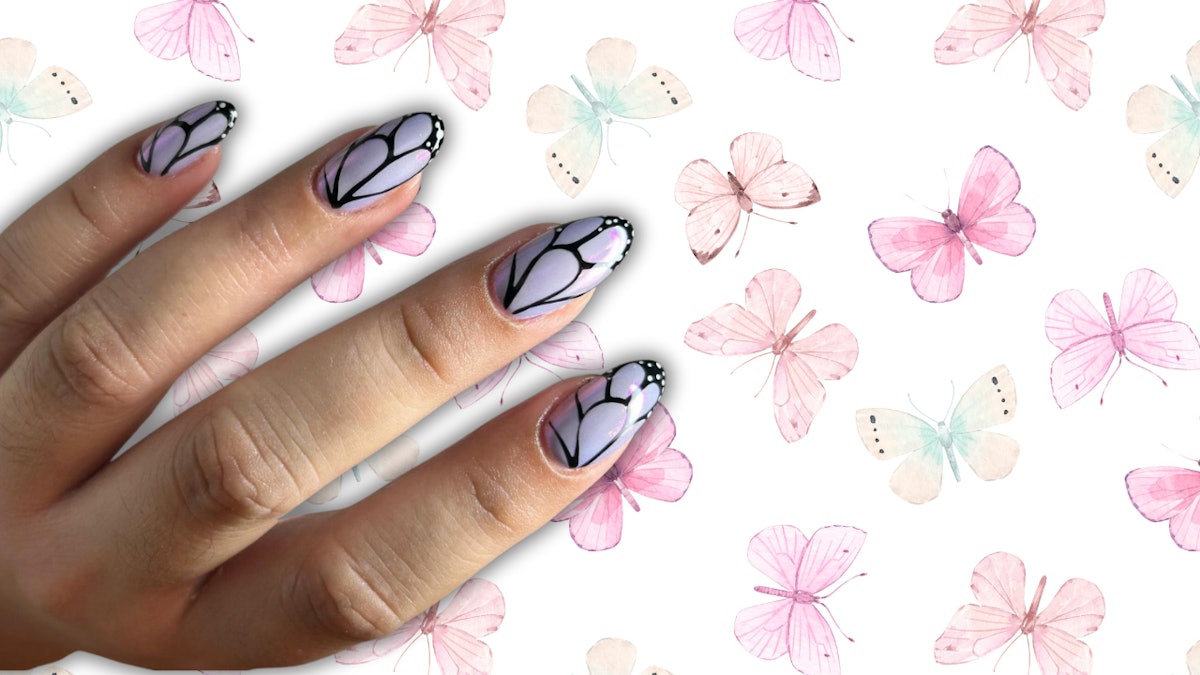
- Apply the Base Color: Choose a pastel purple (or another favorite color) as the base color. This soft hue beautifully sets the stage for the vibrant butterfly wings.
- Top Coat Application: After the base color is dried, apply a thin layer of top coat to protect the base and provide a smooth surface for the next steps.
- Add Sheen: Rub a sheer, iridescent chrome powder over the nails. This step adds a gorgeous shimmery finish that resembles the delicate sheen of butterfly wings.
- Paint the Wings: Using a thick, pigmented black gel, start painting the butterfly wings. Incorporate white gel for highlights and details to create a more realistic effect. Don’t worry about perfection – the beauty lies in its playful nature!
- Final Touch: Once the wings are complete, finish with a shiny top coat for a flawless and durable finish.
Tips for Perfecting Your Butterfly Nails
For those new to nail art, perfection comes with practice. Here are a few tips to keep in mind:
- Experiment with colors: While Milli suggests a pastel purple base, feel free to experiment with other colors that complement your style.
- Use nail art brushes: Invest in a good set of nail art brushes to achieve precise lines for your butterfly wings.
- Practice on a nail wheel: If you’re unsure about painting directly on your client’s nails, practice on a nail art wheel first.
Conclusion
Transform your spring nails with the enchanting charm of Y2K butterfly nails! This tutorial from Milli Mac highlights not only the fun and creative aspects of nail art but also provides an avenue for personal expression. Whether you’re a nail technician looking to expand your repertoire or an enthusiast eager to try something new, these butterfly nails will no doubt leave hearts fluttering everywhere. Share your creations online, and don’t forget to tag Milli Mac to showcase your stunning Y2K nail art!


