Introduction
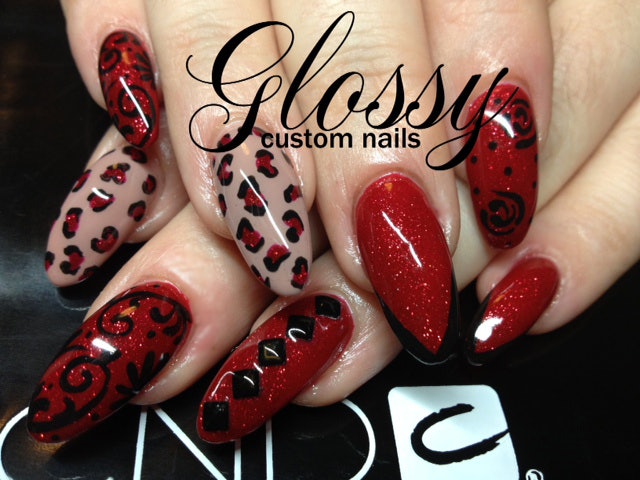
In the world of beauty, nail art has carved out its unique niche, allowing individuals to express their creativity and style through carefully crafted designs. Among the myriad of nail art techniques, a red shellac manicure stands out for its elegance and sophistication. In this comprehensive tutorial, we will guide you through the steps to create a stunning red shellac manicure, complete with leopard patterns, opulent swirls, and striking studs, as demonstrated by Sharleen of Glossy Custom Nails.
Why Choose Shellac?
Shellac has gained immense popularity due to its durability and high-gloss finish. Unlike traditional nail polish, shellac provides a long-lasting manicure that can withstand daily wear and tear. Furthermore, its quick-drying formula saves time, making it perfect for those with a busy lifestyle. Additionally, shellac is kinder to the nails than acrylics or gels, reducing the risk of damage.
What You Will Need
- CND Shellac Base Coat
- CND Shellac Top Coat
- Red Shellac Color of Your Choice
- Acrylic Paint (Black and Other Colors)
- Nail Art Brushes
- Nail Glue
- Studs or Rhinestones
- Nail UV Lamp
Step-by-Step Tutorial
Step 1: Prepare Your Nails
Begin by prepping your nails. Ensure they are clean and dry. File and shape your nails to your desired length. This is crucial for achieving a neat and polished look. Apply the CND Shellac base coat to each nail, sealing the edges for better longevity, and cure under a UV lamp according to the manufacturer’s instructions. This step ensures a strong foundation for your manicure.
Step 2: Apply the Red Shellac Color
Once the base coat is cured, it’s time to apply the red shellac color of your choice. Two coats may be necessary to achieve the perfect opacity. After applying each coat, remember to cure under the UV lamp adequately. A well-cured base and color are essential for a long-lasting and vibrant manicure.
Step 3: Create Your Design
After your red shellac color has cured, take a small amount of acrylic paint to design your nails. For this tutorial, you can create leopard patterns, swirls, or any design you prefer. Be creative but ensure that it aligns with the elegant theme. Allow your design to dry completely before moving on to the next step. Patience here will lead to a more polished outcome.
Step 4: Add Bling
Enhance your manicure by adding studs or rhinestones. Apply a small amount of nail glue where you want the embellishments to sit. Utilize a tool or a toothpick to carefully place the studs onto the glue. This addition will elevate your manicure, providing that extra touch of elegance.
Step 5: Final Touches
As a final step, introduce some character by adding misshapen shellac spots to your feature nail. These spots add a unique texture and dimension to the overall look. Cure one last time after application. To finish, seal the entire manicure with CND Shellac top coat for a high-gloss finish and extended wear. Cure one last time to achieve a perfect seal.
Conclusion
Creating an elegant red shellac manicure doesn’t have to be complicated. By following these simple steps and employing the right tools, you can achieve a salon-quality look from the comfort of your home. For more nail art inspiration and tips, be sure to visit Glossy Custom Nails at www.glossynails.com. Transform your nails into a masterpiece today!
Follow Us
Stay connected with Glossy Custom Nails for more nail art ideas and tutorials. You can find us on Twitter @Glossynails, Instagram @Glossynails, and Facebook at Glossycustomnails. For queries or appointments, don’t hesitate to call us at 604.808.6285.


