Introduction
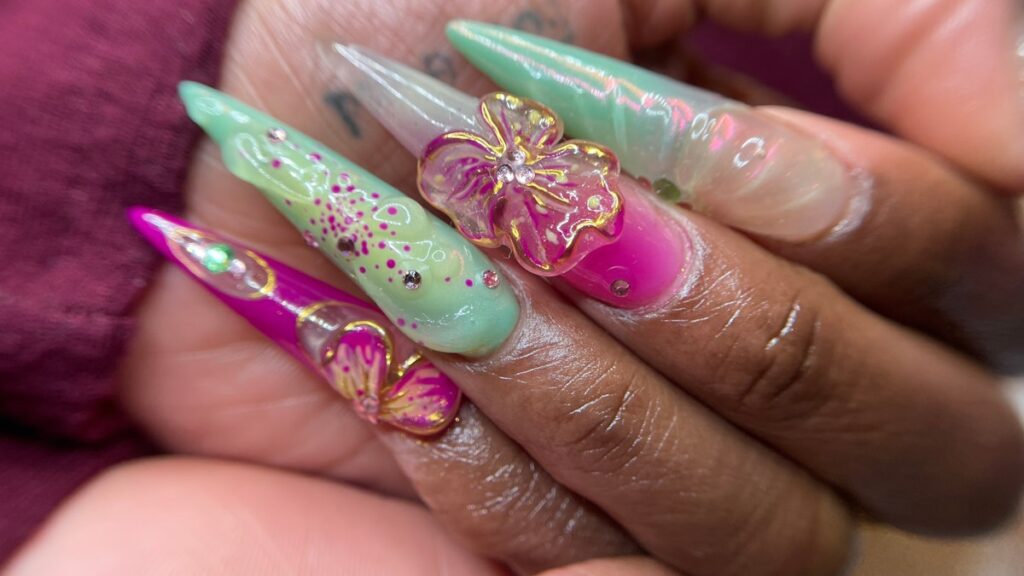
The Tony Awards celebrate the best in Broadway talent, and this year, musical theatre star Cynthia Erivo dazzled the audience not just with her presence but also with her stunning nail art. Designed by celebrity nail artist Rose Hackle, Erivo’s 3D floral manicure was a vibrant blend of colors and textures that perfectly complemented the evening’s festivities. In this guide, we will take you through the step-by-step process to recreate this show-stopping nail art, ensuring you too can bloom boldly.
Step 1: Nail Preparation
To begin your journey to a fabulous 3D floral manicure, you must first remove any previous nail polish or set. Full soak-off removal is recommended to ensure a clean slate for your new design.
Tools and Products Needed:
- Soak-off remover
- Nail file
- Cuticle pusher
Once the previous set is fully removed, gently buff the nails to create a smooth surface.
Step 2: Shaping the Nails
Achieving the stunning XXL stiletto shape seen on Erivo starts with applying sculpted stickers and a sculpted acrylic base. Use a suitable acrylic product to form the desired length and shape.
Essential Tools:
- Sculpted stickers
- Sculpted acrylic
Step 3: Base Coat Application
After shaping the nails, the next step is to ensure a long-lasting finish. Apply the OPI GelColor Stay Strong Base Coat to each nail. Once applied, cure each nail under the OPI Star Light Gel Lamp to ensure durability.
Recommended Product:
- OPI GelColor Stay Strong Base Coat
- OPI Star Light Gel Lamp
Step 4: Adding Color
Cynthia Erivo selected a vibrantly bold color palette for her nails. To replicate this look, use OPI’s Your Way shades, such as $elf Made, Taurus-t Me, and Without A Pout, and apply them with an airbrush for a seamless finish.
Color Choices:
- $elf Made
- Taurus-t Me
- Without A Pout
Step 5: Creating the Psychedelic Effect
Utilizing a dotting tool and blooming gel, begin to create a psychedelic pattern. This artistic technique will add depth and intrigue to the nail art that beautifully complements the 3D flowers.
Step 6: Sculpting the 3D Flowers
The pièce de résistance of this manicure is the 3D floral elements. Mold 3D flowers using sculpting hard gel. Additionally, paint colorful accents on these flowers using OPI shades like (Bee)FFR and Apricot AF to bring them to life, ensuring they tie in with the vibrant nature of the overall nail design.
Flower Colors:
- (Bee)FFR
- Apricot AF
Step 7: Final Touches with Accents
Once you have molded your flowers, apply them to the nails using medium viscosity charm glue. For that extra dazzle, incorporate green and pink Swarovski stones to accentuate the floral design, enhancing the final look.
Step 8: Top Coat and Finish
To complete your beautiful floral manicure, apply one coat of OPI GelColor Stay Shiny Top Coat for a glossy finish. Finish off with OPI Nail & Cuticle Oil to ensure your nails look healthy and radiant.
Final Products Used:
- OPI GelColor Stay Shiny Top Coat
- OPI Nail & Cuticle Oil
Conclusion
By following these steps, you can achieve a striking 3D floral manicure inspired by Cynthia Erivo’s stunning look at the Tony Awards. Remember, nail art is an expression of individuality, so feel free to personalize this design with your favorite colors and embellishments. After all, as Rose Hackle says, ‘the world needs your vibrant spirit.’ Get ready to bloom boldly!

