Introduction to Golden Flutter Nails
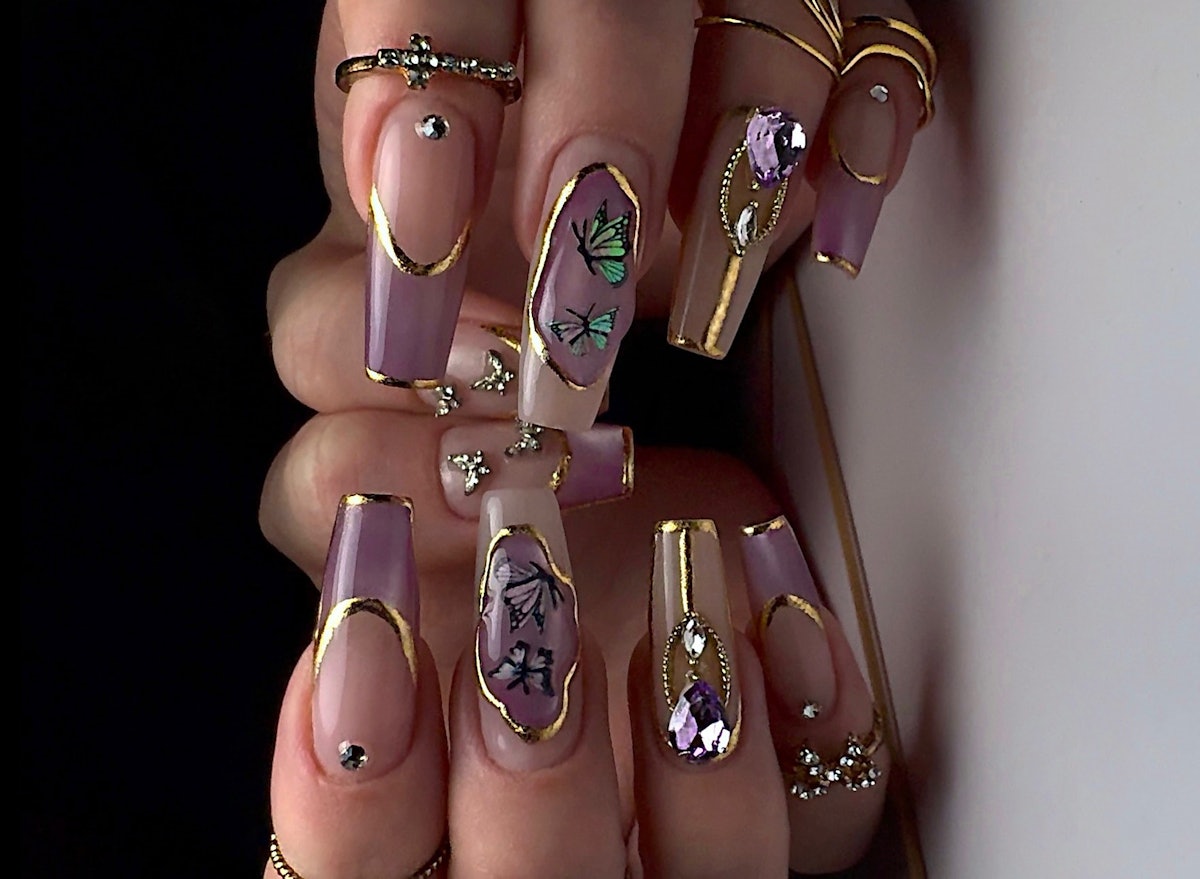
Spring is the perfect season to experiment with vibrant and playful nail designs. Among the trending styles this year, Golden Flutter Nails stand out due to their enchanting combination of gold chrome accents and delicate purple butterflies. Created by the talented nail artist Deanna Stelmaschuk, this stunning nail set not only embodies the spirit of spring but also showcases a unique artistic flair. In this article, we will guide you through the process of creating your own Golden Flutter Nails, inspired by Deanna’s beautiful design.
Who is Deanna Stelmaschuk?
Deanna Stelmaschuk is a distinguished content creator and nail competitor from Kelowna, British Columbia. She has made a name for herself in the nail art community by bringing her love for nature and fashion into her designs. This dual passion is often reflected in her work, making her nail art stunningly unique and expressive. You can check out more of her incredible designs on her Instagram page @deannastelmaschuk.
Materials Needed for Golden Flutter Nails
Before embarking on this creative journey, gather the following materials:
- Nail polish in gold chrome
- Pastel purple nail polish
- Nail art brushes
- Butterfly nail decals or nail stickers
- Base coat and top coat
- Nail file and cuticle pusher
- LED or UV nail lamp (if using gel polish)
Step-by-step Guide to Creating Golden Flutter Nails
Step 1: Prepare Your Nails
Start by prepping your nails. Clean and shape them using a nail file. Push back your cuticles gently, ensuring a clean nail surface. Apply a base coat to protect your natural nails and enhance polish adhesion.
Step 2: Apply the Base Color
Once your base coat is dry, apply two coats of pastel purple nail polish to all your nails. Allow each coat to dry completely before applying the next.
Step 3: Add Gold Chrome Accents
Using a nail art brush or a dotting tool, carefully apply gold chrome nail polish at the tips of your nails or in a design of your choice. This could include stripes, dots, or swirls. Make sure to use a steady hand for clean lines!
Step 4: Time for Butterflies!
Now it’s time to add the beautiful butterfly accents! You can either paint butterflies freehand with a fine nail art brush or use butterfly nail stickers for ease. Place them strategically on your nails to create an elegant look.
Step 5: Seal the Design
Once you are satisfied with your butterfly placement and the gold accents are dry, finish your design with a top coat. This will protect your artwork while adding a glossy finish.
Step 6: Drying and Final Touches
If you are using gel polish, cure your nails under an LED or UV lamp as per the product instructions. If you used regular polish, allow your nails to dry thoroughly to avoid smudging.
Tips for Perfecting Your Golden Flutter Nails
To ensure your Golden Flutter Nails look their best, consider the following tips:
- Choose high-quality nail polishes for vibrant color and durability.
- Be patient and allow each layer to dry completely.
- Practice painting butterflies to improve your technique.
- If you’re using stickers, make sure they’re pressed down well to prevent lifting.
Conclusion
Creating your own Golden Flutter Nails is a delightful way to celebrate the arrival of spring. By following Deanna Stelmaschuk’s inspiring design, you can infuse your own creativity into this stunning nail art. Whether you’re preparing for a special event or just want to showcase your style, these nails are sure to turn heads. Don’t forget to share your finished nails on social media and tag @deannastelmaschuk for a chance to connect with the nail art community!


