Introduction
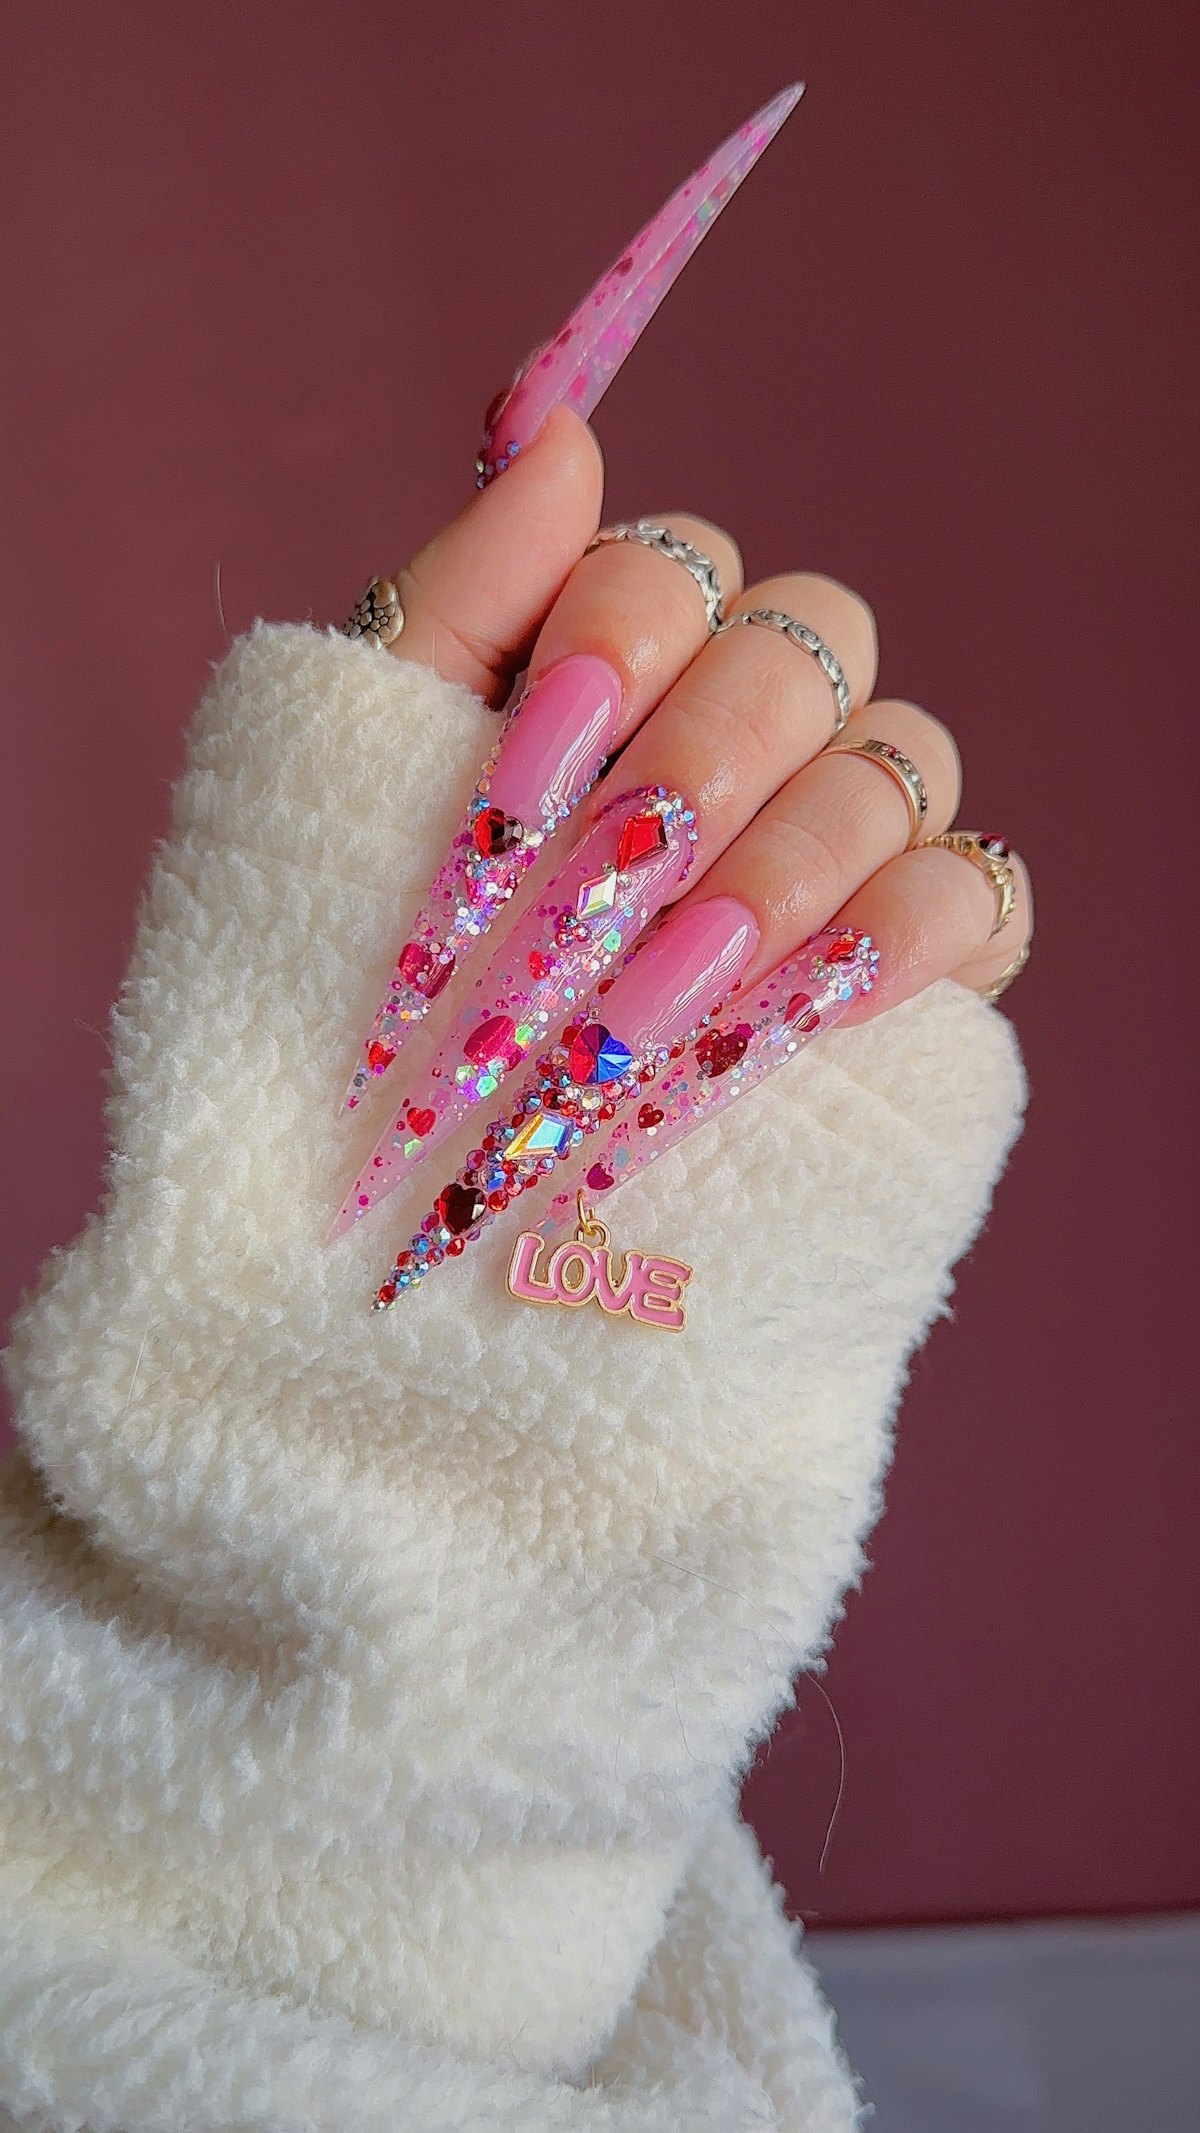
Welcome to this exciting tutorial on how to achieve the beautiful ‘Stuck In Love’ nail design, perfect for Valentine’s Day! Lindsay Walters, known as Nails_by_Lindsay_, will guide you through creating this eye-catching style that will leave everyone in awe. With a mix of captivating colors and stunning embellishments, you’ll learn to craft nails that truly express love and creativity.
Products You’ll Need
Before we dive into the step-by-step process, let’s gather the necessary products you’ll be using.
- Ana Does Nails ‘Love Bomb’ Glitter Acrylic
- Tones Clear Acrylic for encapsulation
- Kiara Sky ‘Dark Pink’ All-in-One Powder for base color
- Madam Glam No Wipe Top Coat
- Makartt Rhinestone Glue for securing rhinestones
Step-by-step Tutorial
Step 1: Nail Preparation
To ensure a flawless application, start by prepping your natural nails. A great duo for preparation is Babe Nails Nail Prep Dehydrator alongside Mega Bond, which helps in reducing lifting and ensures the acrylic adheres well.
Step 2: Apply Color and Glitter Acrylic
We’ll break this down according to each nail’s specific design:
- Thumb Glitter Ombre: Apply the dark pink acrylic at the nail’s tip and gently drag your brush towards the tip to create an ombre effect. Build up the apex while ensuring that less product is used toward the tip. Then, incorporate the glitter (Love Bomb) by filling in the clear tip and dragging it towards the darker pink, focusing on smaller glitters near the cuticle.
- Pointer Acrylic French: Start with a bead of acrylic at the tip and drag down the center to shape the French tip. Add more beads to refine the shape, ensuring a symmetrical look, then apply the glitter acrylic on top to fill in the design.
- Middle Glitter Ombre: For this fingernail, apply dark pink acrylic fully over the nail, leaving the tip slightly thinner. Add the Love Bomb glitter on the extended tip while only dragging smaller glitter pieces up past the tip.
- Ring Dark Pink: This nail is straightforward: apply dark pink acrylic as desired without the need for encapsulation.
- Pinky Glitter Ombre: Use the same technique as the middle finger for consistency.
Step 3: Encapsulation
Encapsulate the thumb, pointer, middle, and pinky with clear acrylic. Build up the apex and shape the nails as needed to ensure a professional finish.
Step 4: Filing and Shaping
Next, file and shape all nails carefully, making sure to seal around the cuticles for a clean look.
Optional Step: Adding Charms
You may want to drill a hole in the pinky nail to attach a charm later. This step is optional, but it can enhance your overall nail design.
Step 5: Rhinestone Application
Rhinestones add a fabulous finishing touch! For application:
- If placing rhinestones on specific nails (like the thumb, pointer, middle, and pinky), squeeze a dab of glue onto a palette, and use tweezers to dip and place them securely on the nail. Cure under the lamp for 30 seconds when satisfied with the arrangement.
- For larger rhinestones, place these first to keep them from sliding when applying smaller ones.
- When working on a French tip, outline with glue, set in the lamp, then carefully apply glue over the tip and fill in with smaller rhinestones.
Step 6: Top Coat
Apply a no-wipe top coat over all nails, making sure to go around the rhinestones but not on top of them, to maintain the sparkle.
Step 7: Adding the Charm
If you opted to drill a hole in the pinky nail, select your desired charm and a loop connector, using pliers to attach it through the hole.
Step 8: Final Touches
Complete your design by applying cuticle oil. With your new ‘Stuck In Love’ nails, you’re ready to dazzle the world!
About Lindsay Walters
Lindsay Walters, a 26-year-old nail influencer based in Atlanta, Georgia, started her journey in the nail industry at the age of 18 after receiving a gel nail lamp from her mom. With a passion for helping others feel beautiful and confident, Lindsay uses her platform to inspire the nail community, focusing on creativity and self-expression.
Now that you have learned how to create the ‘Stuck In Love’ design, gather your materials and get started on your nail art journey!


