Introduction
As sandal season approaches, nobody wants to reveal unsightly calluses on their feet. Thankfully, achieving beautiful, baby-soft feet doesn’t have to be a backbreaking task. In this detailed guide, we’ll walk you through 8 efficient steps to remove calluses with minimal effort, ensuring your clients leave your salon feeling fabulous. Don’t forget to follow our expert tips for best results!
Important Precautions
Before starting the callus removal process, it’s crucial to assess your client’s foot health. If there are any open wounds, infections, or signs of severe skin conditions like psoriasis or eczema, refrain from performing the treatment and refer them to a dermatologist or podiatrist. Always wear disposable gloves to maintain hygiene, and consider wearing a face mask for additional protection.
Items Needed
For this callus removal process, gather the following items:
- PodoSafe Callus Softener
- PodoSafe Cuticle Softener
- Plastic film roll
- Cotton rounds
- Curette with retractor
- Disposable foot files
- Towel or paper towel for drying
- Skin moisturizer (optional)
Step 1: Application of PodoSafe Callus Softener
Start with dry feet. Spray PodoSafe Callus Softener onto a cotton round and apply it directly to the callused areas. This technique maximizes product usage and prevents overspray. Avoid spraying directly on the foot to prevent wastage.
Step 2: Wrapping for Maximum Effectiveness
Use plastic wrap to keep the cotton rounds in place while retaining warmth around the foot. Be careful not to over-tighten the plastic wrap. Typically, a soaking time of about 7 minutes is recommended, but it can vary based on the client’s foot temperature. For extra tough calluses or cold feet, consider wrapping in aluminum foil or using thermal pads to enhance results. Applying a small amount of cuticle oil can speed up the process, but be cautious not to use too much oil as it can hinder PodoSafe’s penetration.
Step 3: Cuticle Softening
As the calluses soak, utilize PodoSafe Cuticle Softener from an eye drop bottle to dampen cuticles without soaking. Place a few drops on each toe and maintain moisture. Gently use a cuticle pusher to push back the cuticles without applying excessive pressure to avoid damaging the nail bed. For ingrown skin, known as onicofosis, carefully soften and remove it starting from the center.
Step 4: Scraping Off Calluses
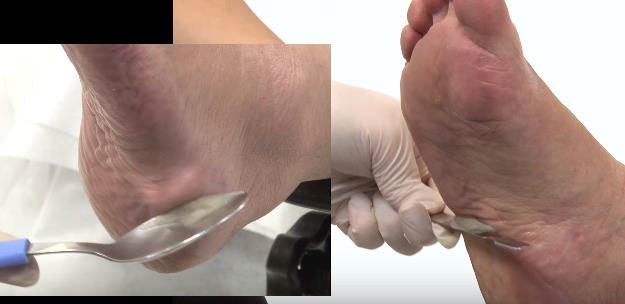
After about 7 to 10 minutes, remove the plastic wrap and cotton. Use a cuticle pusher or spoon to scrape off the softened calluses. If more soaking time is needed, you can repeat the wrapping process. The product’s effectiveness typically increases with longer soak times.
Step 5: Buffing Remnants
Next, use a disposable foot file to gently buff away any remaining calluses. Once the product dries, calluses will become easier to smooth out, so take your time to ensure all areas are addressed.
Step 6: Thorough Cleaning
Rinse the feet thoroughly using warm water to ensure that all product residue and exfoliated skin are washed away. Properly drying the feet with disposable towels is essential for skin health.
Step 7: Disposal of Materials
Once the treatment is complete, discard the plastic sleeve from the foot files. There’s no need to sterilize the handle, as it is fully encapsulated, making it the most sanitary option in the industry.
Step 8: Moisturizing
Finish with the application of a nourishing skin moisturizer to keep the feet hydrated and soft.
Note on Follow-Up Treatments
If your client has significant callus buildup requiring a second treatment, it’s advisable to wait a week before the next session. Space out treatments to prevent excessive skin reactions and further callus formation.
Conclusion
With these eight simple steps, you can provide your clients with the beautifully soft feet they desire, all while minimizing effort on your part. Regular callus care and proper techniques will lead to healthier feet and happier clients this summer!

