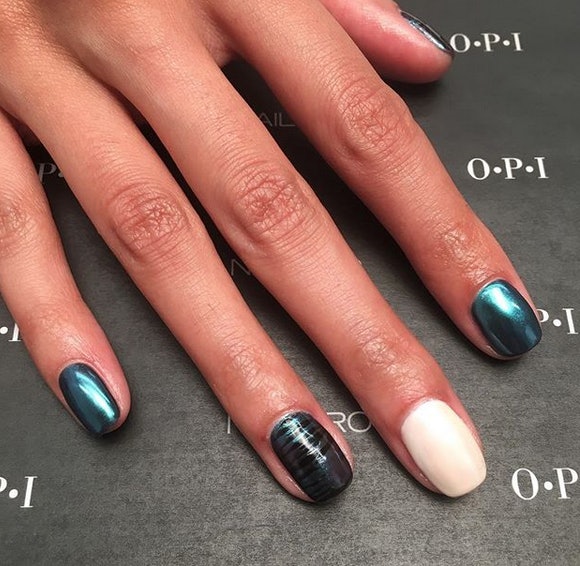
Discover the Magic of OPI Chrome Effects Pigment Powders
If you’re a nail art enthusiast, you’re likely always on the lookout for new products to enhance your creativity. One such innovative product is the OPI Chrome Effects Pigment Powders. These powders can transform your nail designs into stunning, eye-catching art. In this article, we will explore how to effectively use OPI Chrome Effects along with expert tips and techniques from Los Angeles-based nail artist, Fariha Ali.
What Are OPI Chrome Effects Pigment Powders?
OPI Chrome Effects are ultra-fine, highly concentrated pigment powders that give your nails a metallic or chrome-like finish. They can be used over regular polish or gel, allowing for versatile designs that can suit any occasion. The stunning visual depth and dynamic reflective properties make them a must-have in any nail art toolkit.
Getting Started with OPI Chrome Effects
Before diving into the application process, it’s essential to gather all necessary materials: OPI Chrome Effects Pigment Powders, a base coat, a top coat, a makeup sponge or applicator, and your choice of polish. Ensure that your workspace is clean and well-lit for the best results.
Step-by-Step Application Guide
1. Prepare Your Nails
Start by preparing your nails. This involves cleaning your nails, pushing back your cuticles, and ensuring your nail bed is smooth. Apply a base coat to protect your natural nails and allow it to dry completely.
2. Apply Base Color
Choose a base color that complements the chrome effects you want to achieve. A solid black, white, or even a bold color will allow the chrome pigments to shine. Apply your chosen polish in two thin layers, allowing each layer to dry thoroughly between applications.
3. Apply the Pigment
Using a makeup sponge or applicator, take a small amount of OPI Chrome Effects Pigment Powder and gently dab it onto your nails. Make sure to cover the entire nail for a uniform appearance. You can also create patterns or gradients by varying the amount of pigment applied.
4. Seal the Design
After applying the pigment, it’s essential to seal your work with a top coat. This will not only lock in your design but also give your nails a glossy finish. Be sure to use a non-wipe top coat for the best results, as this prevents any residue from dulling the chrome effect.
5. Let it Dry
Allow your nails to dry completely. Depending on the products used, this may take a few minutes to an hour. It’s crucial not to rush this step to maintain the integrity of the design.
Expert Tips from Fariha Ali
Fariha Ali, renowned for her innovative nail art techniques, shares some valuable tips to consider when working with OPI Chrome Effects:
- Experiment with layering different colors of pigments to create unique effects.
- Use a soft brush to remove any excess pigment around the nails after application.
- For intricate designs, consider using nail art brushes for precision.
- Practice makes perfect; don’t be discouraged if your first tries don’t come out as expected.
Join Us for a Live Demonstration
For a more visual guide, check out the Facebook Live videos where Fariha Ali demonstrates these techniques in real-time. Watching a professional at work can provide inspiration and spark ideas for your future nail art adventures.
Conclusion
OPI Chrome Effects Pigment Powders are an exciting addition to any nail artist’s repertoire. With a variety of application techniques and endless creative possibilities, these powders can help you achieve stunning nail art that truly stands out. Are you ready to try them yourself? Share your experiences and designs in the comments below!
Remember, practice is key when it comes to perfecting your technique. So grab your OPI Chrome Effects and get started on your nail art journey today!

