How to Create Little Mermaid Inspired Nails
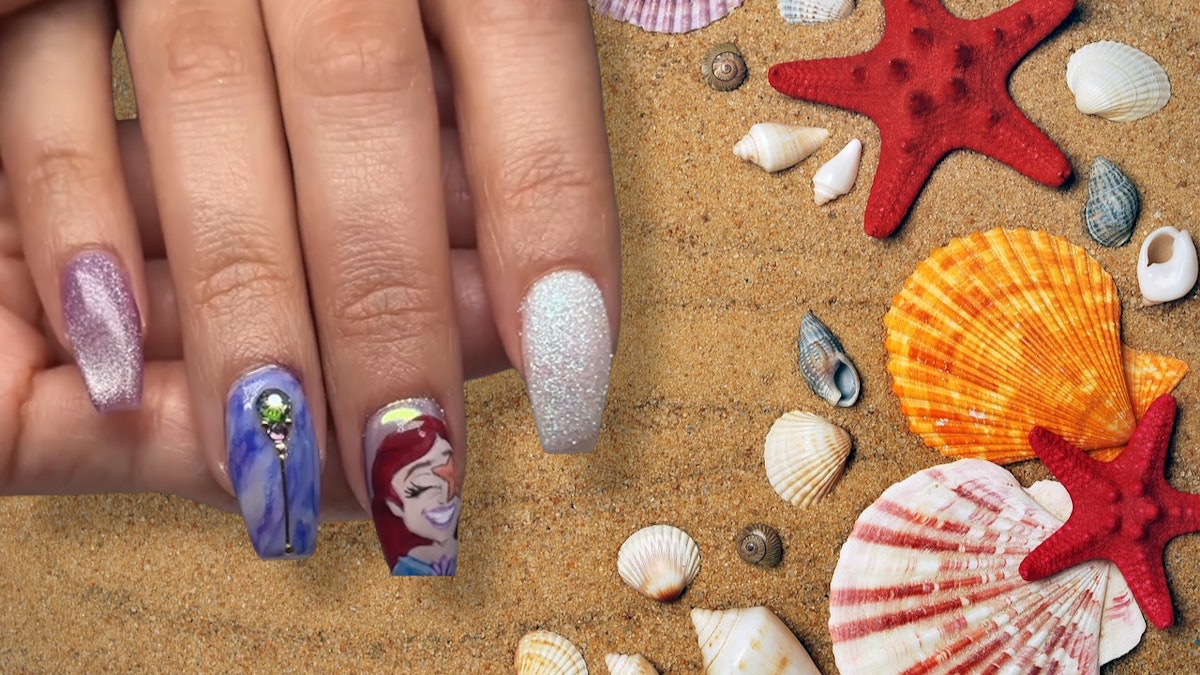
WISH I COULD BE PART OF THAT WORLD… You CAN be part of the mermaid nails trend with this nail art tutorial from Nguyen Nhung (@beautybynoon)!
Nhung mapped out her design before getting to work on the actual set. She emphasizes the importance of preparation: “I find this very helpful in figuring out what to do, so it won’t take as much time,” she told Nailpro. Let’s dive into her stunning Mermaid Nail Art tutorial!
Nail Art Ideas
Before you begin, take inspiration from the beauty of the sea, and think about colors that reflect The Little Mermaid theme. Nhung sketched out her ideas for her mermaid nail set, which serves as a fantastic blueprint for your own creativity!
Mermaid Nail Art How-To
- Apply Your Desired Base Coat: Start by choosing base colors that resonate with the oceanic theme. Nhung recommends using nude, white, and purple base colors to create a stunning backdrop.
- Add Tints of Blue and Purple: On the nude nail base, blend in shades of blue and purple. This will provide a gradient effect reminiscent of the ocean depths. Additionally, add a chrome color or powder to the purple nail for an extra touch of sparkle.
- Apply Cat Eye using Hypno Gel: For the enchanted look, apply a cat-eye effect on the tinted purple nail using hypno gel. The shimmering effect will bring an ethereal quality to your nails.
- Apply Water Marble: Create a beautiful water marble effect on one of the white nails to simulate the ocean waves. This technique adds depth and texture.
- Apply Non-Wipe Top Coat: Once your designs are in place, apply a non-wipe top coat. For a magical finish, sprinkle fairy dust on your nails before curing to add a whimsical sparkle.
- Draw the Silhouette of Ariel: Channel your inner artist and draw Ariel’s silhouette on one of the nails. Start by filling in her skin color, followed by her trademark vibrant hair color.
- Paint Ariel’s Facial Expression: The finishing touch is to paint on Ariel’s facial features. This requires a steady hand and patience. Once you are satisfied, cure the nail to set the design!
The entire look took two hours to design and four hours in total to complete. Nhung shared the experience on her Instagram: “This was a mission, but I find it so exciting when I’m done… So grateful for my clients and their patience!”
Share Your Mermaid Nails!
After creating your beautiful mermaid nails, we encourage you to share your nail art with us using the hashtag #nailpromermaidnails! Show us your unique designs and connect with fellow nail art enthusiasts.
To stay updated with the latest trends and tips for nail professionals, follow Nailpro on Instagram and subscribe to our free daily newsletter for all the newest insights.
Let your creativity flow like the waves of the ocean as you express your love for The Little Mermaid through these magical nails!


