Introduction to Mia Secret 4-D Nail Plastiline
The beauty world is continuously evolving, and nail art is no exception. One of the latest innovations making waves in the nail industry is the Mia Secret 4-D Nail Plastiline. This versatile, white UV/LED gel allows nail artists to create stunning, multidimensional art while working with various tools such as brushes, dotting tools, and silicon tools.
What is 4-D Nail Plastiline?
Mia Secret 4-D Nail Plastiline is a unique gel designed specifically for nail art. With its pliable texture, this gel can be molded into intricate designs, allowing for a high degree of creativity. Perfect for creating 3D flowers, crochet effects, and other detailed nail enhancements, this product has quickly become a favorite among professionals and enthusiasts alike.
Essential Tools and Materials
Before diving into your nail art adventure, gather the following tools and materials:
- Nail Prep and Xtrabond Primer
- Cover Pink Acrylic
- Multibalance Acrylic
- White Acrylic
- UV Finish Gel Ultra Shine
- Mia Secret 4-D Nail Plastiline
- 3D Brush
- Paint Spatula
- Dotting Tool
- Gems for embellishment
Step-by-Step Guide to Using Mia Secret 4-D Nail Plastiline
Step 1: Nail Preparation
Start by prepping the nail. Use Nail Prep and apply Xtrabond Primer. Follow this by placing a nail form to shape the nail accurately.
Step 2: Extending the Nail Bed
Using Cover Pink acrylic, extend the natural nail bed. Apply Multibalance acrylic specifically on the cuticle area to provide a seamless blend.
Step 3: Sculpting the Free Edge
Now it’s time to sculpt the free edge. Apply White acrylic and allow it to set. Once hardened, carefully remove the form. Shape and file the nail to your preference, sealing it with UV Finish Gel Ultra Shine. Cure for 60 seconds to lock in the shine.
Step 4: Creating 3D Flowers
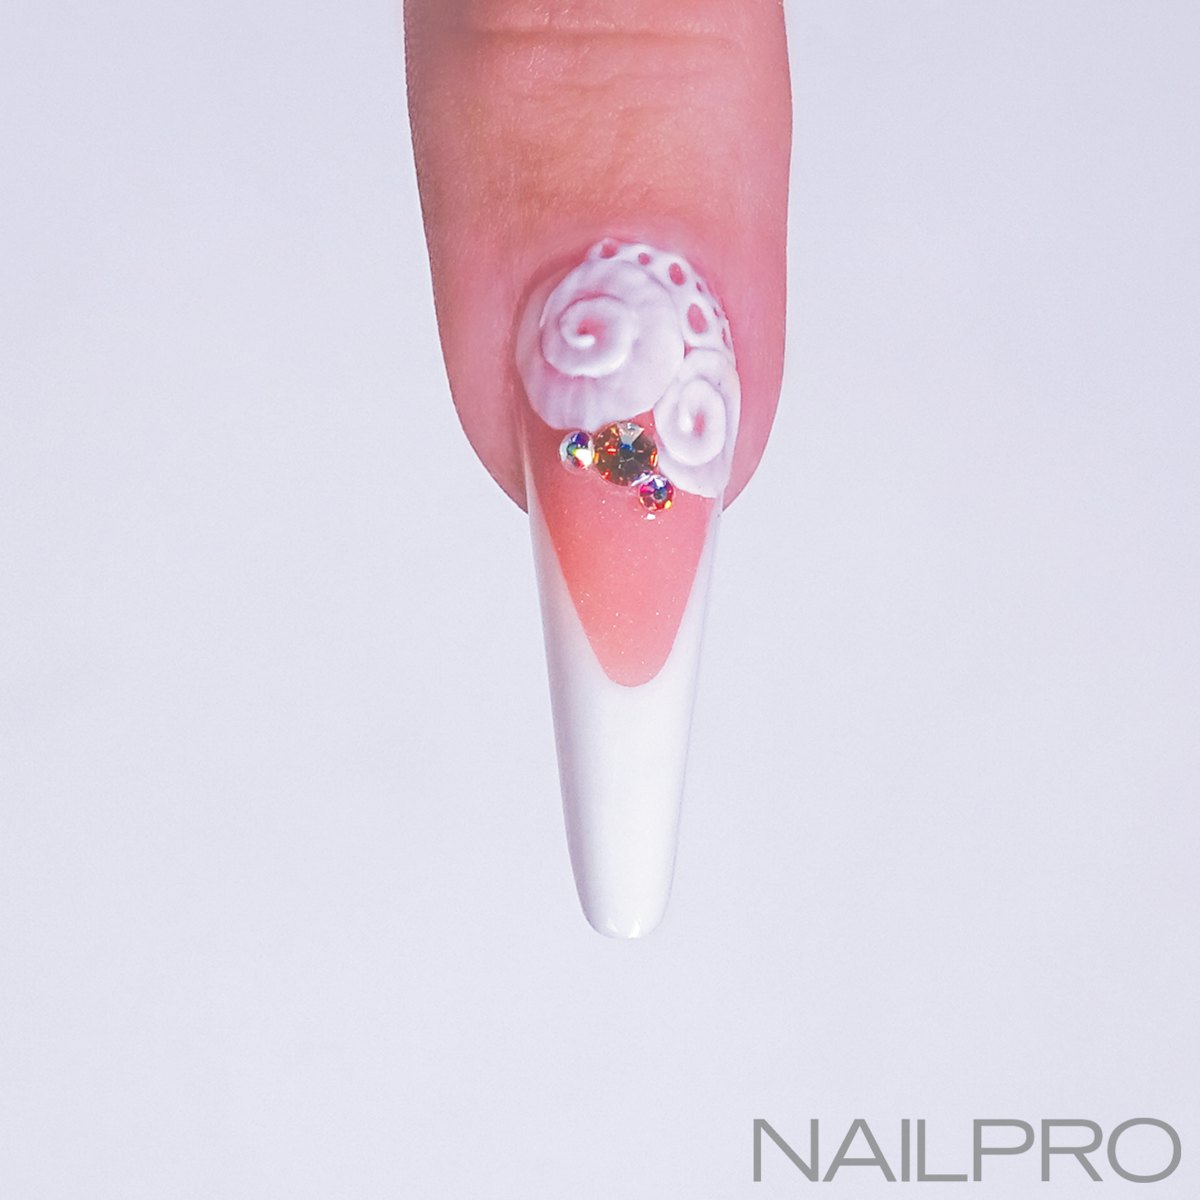
To start your floral designs, apply a medium-sized pearl of 4D Nail Plastiline to the cuticle area. Using a 3D Brush, work the product into a spiral shape to form a flower and cure for 30 seconds to set the design.
Step 5: Achieving a Crochet Effect
Using a paint spatula, apply a small amount of 4D Nail Plastiline over the nail. With a 3D Brush, spread it into a thin layer. Take a dotting tool to carve out small circles for a crochet effect and cure again for 30 seconds.
Step 6: Final Touches
To complete your nail art masterpiece, add gems to the design for an extra touch of glamour. Ensure everything is well set by curing again as needed.
Conclusion
Mia Secret 4-D Nail Plastiline opens up a world of possibilities for nail design enthusiasts. Its ease of use and versatility means you can express your creativity while producing stunning, professional-quality results. Have you tried Mia Secret’s 4-D Nail Plastiline? Share your comments and experiences with us below!
Additional Resources
For more information on Mia Secret products and nail art techniques, visit miasecretnails.com.


