Introduction
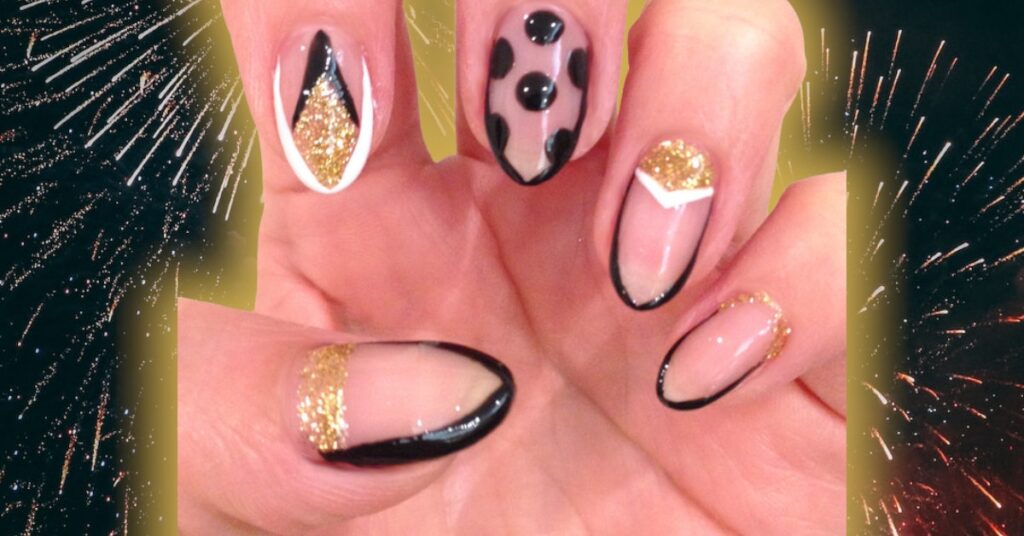
As New Year’s Eve approaches, many look for ways to bring in the new year with style. One delightful way to do this is through festive nail art. This tutorial will guide you through creating a stunning New Year’s Eve nail art design that is not only simple but also perfect for impressing your clients or rocking at any celebration.
Materials Needed
Before we dive into the tutorial, ensure you have the following materials ready:
- Black nail polish
- Gold nail polish
- White nail polish
- Gold glitter nail polish
- Base coat and top coat
- Nail dotting tool or toothpick (for polka dots)
- Nail brushes for precision
Step-by-Step New Year’s Eve Nail Art Design
Step 1: Prepare Your Nails
Start with clean, shaped nails. Apply a base coat to protect your natural nails and help the polish adhere better.
Step 2: The Thumb Design
For the thumb, paint a black “V” shape on the tip of the nail. This will serve as a bold base for your festive theme.
Step 3: Add Gold Polish
Next, take the gold polish and fill in the area below the black tip. This contrast will make the design pop and gives off a luxurious vibe suitable for New Year celebrations.
Step 4: Index Finger Decoration
On the index finger, create a white curved “V” line at the tip. This softens the look and introduces a bit of elegance to your set.
Step 5: Middle Finger Art
For the middle finger, draw another “V” curved line at the top. In between these lines, add polka dots for a playful touch that captures the festive spirit.
Step 6: Ring Finger Creativity
On the ring finger, paint a black “V” curved line. Between the black lines, you will draw a reverse “V” using the white polish to create a striking contrast.
Step 7: Glitter Glam
Apply gold glitter nail polish between the white lines on the ring finger to add shimmer and sparkle, evoking the excitement of New Year’s Eve!
Step 8: Pinky Finger Finale
Lastly, for the pinky, draw curved “V” lines at the tip. Create a “V” line at the bottom of the pinky finger using the gold glitter nail polish for a final touch of festivity.
Finishing Touches
To complete your design, apply a top coat. This not only seals in your artwork but also adds a glossy finish, making your nails look professionally done!
Conclusion
Your New Year’s Eve nails are now ready to dazzle. This simple tutorial allows you to express creativity while celebrating the new year in style. Share this tutorial with your friends, or recreate it for your clients to inspire them this holiday season!
For more nail art inspiration, follow Nailpro on Instagram and subscribe to our newsletter for the latest updates and trends in the nail industry.

