Introduction
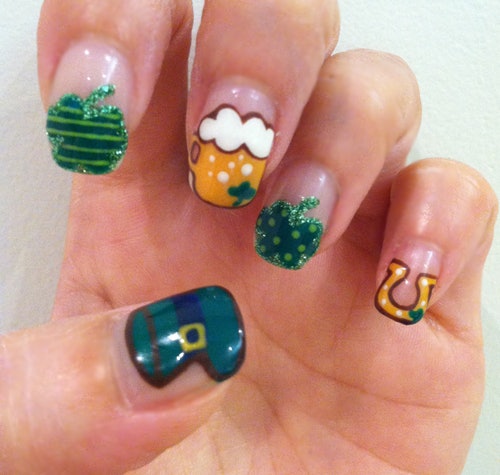
St. Patrick’s Day is the perfect occasion to show your festive spirit through creative nail art. Whether you’re heading to a party or just want to embrace the holiday cheer, a beautifully designed set of nails will do the trick. In this easy-to-follow tutorial, we will explore how to create a fun St. Patrick’s Day nail art design featuring delightful motifs such as four-leaf clovers, a leprechaun’s hat, a pint of beer, and lucky horseshoes.
What You’ll Need
Before we get started, make sure you have the following tools and supplies:
- Base coat polish
- Green nail polish
- White and yellow nail polish
- Light green nail polish
- Green glitter polish
- Nail art brushes or dotting tools
- Top coat polish
Step-by-Step Tutorial
Step 1: Prepare Your Nails
Start by applying a base coat to protect your natural nails and ensure that your polish adheres well. This step is crucial as it helps prevent staining and extends the life of your nail art.
Step 2: Create the Base Design
Once your base coat is dry, it’s time to start painting. For a fun St. Patrick’s Day theme:
- On your thumb, use green polish to paint a leprechaun’s hat.
- On your index and ring fingers, paint a four-leaf clover using the same green polish.
- For your middle finger, create a pint of beer, using white for the foam and yellow for the beer itself.
- Finally, on your pinky finger, paint a lucky horseshoe using yellow polish.
Step 3: Add Details
To elevate your design, you’ll want to add some beautiful details:
- Using a thin brush, paint edges around all of your designs for a polished look.
- On the index and ring fingers, add border lines and decorative dots with light green polish.
- Highlight the clover by painting a ridge using green glitter polish.
- You can also paint a smaller clover with green polish on the middle and pinky fingers for an extra touch.
Step 4: Finish with a Top Coat
To seal your art and ensure its longevity, apply a top coat. This will not only add shine but also help protect your design from chipping. Let it dry completely before showing off your fabulous nails!
Conclusion
Creating St. Patrick’s Day nail art can be a delightful way to celebrate the holiday. With just a few colors and simple designs, you can achieve a festive look that is sure to impress your friends and family. For more stunning nail designs, check out MARS the Salon in West Hollywood, known for its intricate nail art and exceptional service.
Now that you’ve mastered this tutorial, don’t hesitate to experiment with different colors or patterns to make the design your own. Happy nail painting!

