Introduction
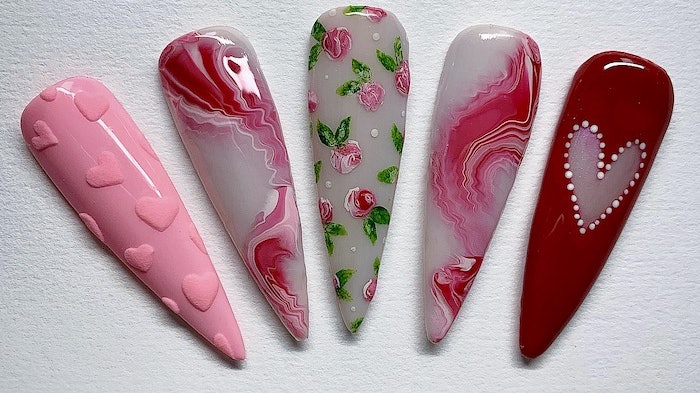
Valentine’s Day is a perfect occasion to express your love, not just through gifts and gestures, but also through stunning nail art. In this guide, we present you with two fabulous nail art tutorials inspired by the essence of Valentine’s Day, created by United Kingdom-based freelance nail artist Amy Rickaby. From heart-shaped candy inspirations to a romantic vintage charm, these designs are sure to make your nails the highlight of your celebration.
Meet the Artist: Amy Rickaby
Amy Rickaby is known for her creative nail art and unique designs that blend various textures and styles. Drawing inspiration from classic Valentine’s Day hues, Amy has crafted two distinct looks that encapsulate the spirit of romance. You can explore more of her creativity on her Instagram page: beautyworksbyamy.
Valentine’s Day Nail Art Tutorial 1: Marble Nail Design
Step-by-Step Instructions
This Marble Nail Design is a sophisticated take on Valentine’s Day nail art, perfect for those who love a little elegance.
Materials Needed:
- Sheer white gel polish
- Pink gel polish
- White gel polish
- Red gel polish
- Blooming gel
- Gel top coat
- Dotting tool
- Gel brush
Step 1:
Start by applying two coats of sheer white gel polish to your nails. Make sure to cure each coat properly to ensure a durable base.
Step 2:
On a color palette, apply a line of pink, white, and red gel colors side by side. Using a dotting tool, mix the colors in a zig-zag motion to create a marbled effect.
Step 3:
Next, apply a layer of blooming gel onto the nail, but do not cure it yet. Take the gel brush and scoop up the mixed colors. Slowly apply the color mix to the nail, gently wiggling the gel off the brush with light pressure.
Step 4:
Allow the colors to disperse naturally to achieve that beautiful smoky marble effect. Once satisfied, cure the nail, and finally, finish with a gel top coat for added shine.
Valentine’s Day Nail Art Tutorial 2: Rosebud Design
Capturing Romance
The Rosebud design is a delicate and romantic style that brings a classic touch to your Valentine’s Day look.
Materials Needed:
- Sheer white gel polish
- Dark green acrylic paint
- Light green acrylic paint
- White acrylic paint
- Red acrylic paint
- Pink acrylic paint
- Gel top coat
Step 1:
Like the marble design, start by applying two coats of sheer white gel polish to your nails. Cure properly after each coat.
Step 2:
Use the dark and light green acrylic paints to sporadically paint leaves across the nail. Mixing these colors will help create depth that enhances the natural appearance of the leaves.
Step 3:
On your palette, blend white, red, and pink acrylic paints together. Use this mix to delicately paint rosebuds next to the leaves you’ve previously applied. Once the rosebuds are dry, finish off your design with a gel top coat for a polished finish.
Tips for Perfect Valentine’s Day Nail Art
To ensure your nail art turns out beautifully, keep these tips in mind:
- Always cure your gel polish and designs properly to avoid smudging.
- Experiment with colors that compliment Valentine’s Day themes, like shades of pink, red, and white.
- Practice your techniques on a nail wheel or practice hand before applying them to your nails.
- Consider adding embellishments, such as small rhinestones or glitter, to enhance your designs further.
Conclusion
These two Valentine’s Day nail art tutorials offer a fantastic way to celebrate love and creativity. With Amy Rickaby’s expert guidance, you can create beautiful, themed nails that are sure to impress. Whether you opt for the smoky marble design or the delicate rosebud look, your nails will undoubtedly be the talk of the day. Happy nail painting!

