Introduction
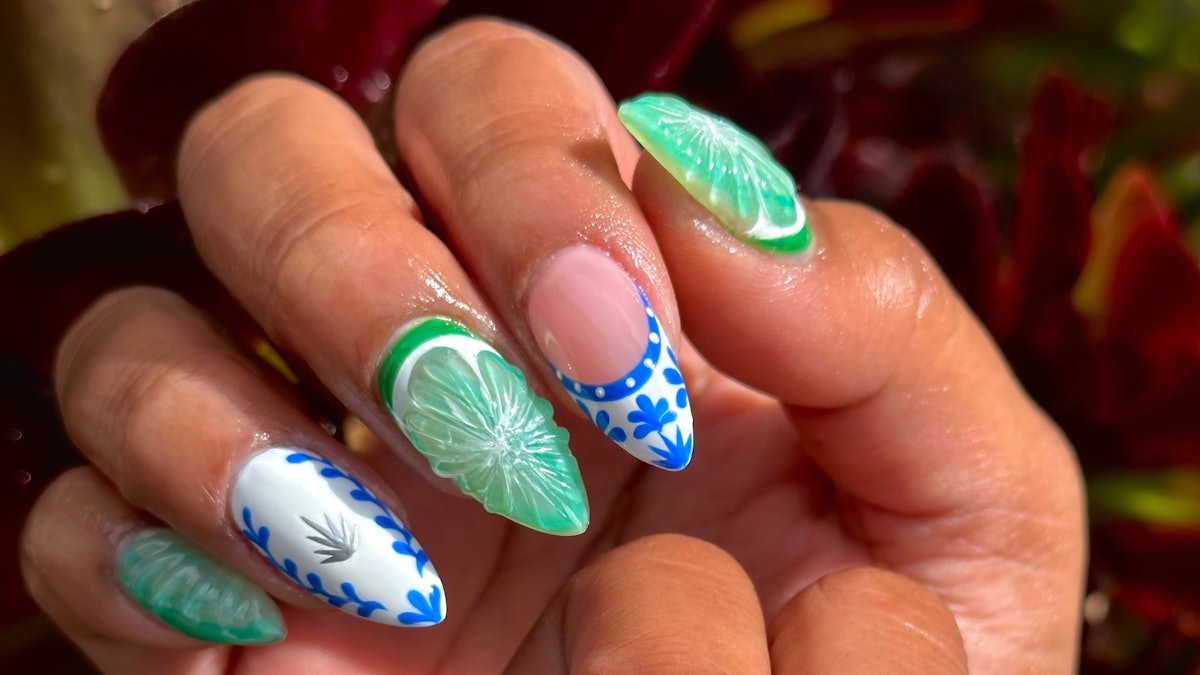
As we dive into summer 2024, the world of nail art is embracing maximalism, bringing bold and creative designs to the forefront. One standout trend that has captured the attention of nail enthusiasts is the combination of vibrant 3D citrus fruits and intricate designs inspired by Clase Azul tequila bottles. This article will explore how to recreate an eye-catching Lime Clase Azul Gel-X nails set, inspired by the talented nail artist Natalie Ulloa, known on Instagram as @natulloanails.
What Inspired the Trend?
The summer of 2024 is all about larger-than-life nail sets that make a statement. The inspiration behind the Lime Clase Azul nails comes from the colorful and artistic design of Clase Azul tequila bottles, which are famous for their unique craftsmanship. Combined with the refreshing look of 3D limes, this nail art represents fun, creativity, and an appreciation for vibrant summer vibes.
Required Materials
Before you start creating your own Lime Clase Azul Gel-X nails, gather the necessary tools and materials:
- Gel-X nail extensions
- Gel nail polish in shades of lime green, white, and blue
- 3D lime nail charms
- Nail glue
- Topcoat and basecoat
- Nail art brush
- Dotting tool
- Lamp for curing
Step-by-Step Guide to Creating Lime Clase Azul Gel-X Nails
Step 1: Prepare Your Nails
Begin by prepping your natural nails. Remove any old polish and shapes, then trim and file your nails to your desired length. Buff your nails to ensure a smooth surface, and apply a base coat before curing under the lamp.
Step 2: Apply Gel-X Extensions
Select your Gel-X nail extensions. Choose sizes that fit each of your natural nails. Apply a small amount of nail glue to the back of each extension, press it onto your natural nail, and cure under the lamp to secure the bond. Repeat for all nails.
Step 3: Base Color Application
Once the extensions are secure, choose a bright lime green gel nail polish as your base color. Apply a thin layer and cure under the lamp. Repeat this step until you achieve the desired opacity.
Step 4: Adding the Clase Azul Design
Using a nail art brush, carefully paint intricate designs inspired by Clase Azul patterns. You can use white and blue gel polish to mimic the beautiful motifs seen on the tequila bottles. If you’re unsure where to start, look up reference images to guide your hand. Cure each layer before moving on to avoid smudging.
Step 5: Create 3D Limes
To add the standout 3D lime elements, use lime nail charms. Apply a small amount of nail glue to the back of each charm and carefully place them onto the desired nails. For an extra touch, consider painting the tip of some nails with black or dark green to represent lime zest.
Step 6: Topcoat Finish
Once you’re satisfied with the design, apply a topcoat to seal in your artwork and add shine. Be sure to cover the 3D elements to protect them from chipping. Cure the final look under the lamp to ensure it sets properly.
Tips for Maintaining Your Lime Clase Azul Gel-X Nails
To keep your nails looking fabulous for longer, consider these maintenance tips:
- Avoid hot water and harsh chemicals on your nails.
- Wear gloves when doing household chores.
- Regularly moisturize your cuticles to keep them healthy.
- Schedule fill appointments every two to three weeks as needed.
Conclusion
The Lime Clase Azul Gel-X nails beautifully encapsulate the boldness of summer 2024 nail trends. By following this step-by-step guide, you can recreate this stunning look and add a splash of color to your nails this summer. Whether you’re a nail art pro or just getting started, this design promises to elevate your summer style.
Don’t forget to share your creations on social media and tag @natulloanails for a chance to be featured! Happy nail painting!


