Introduction
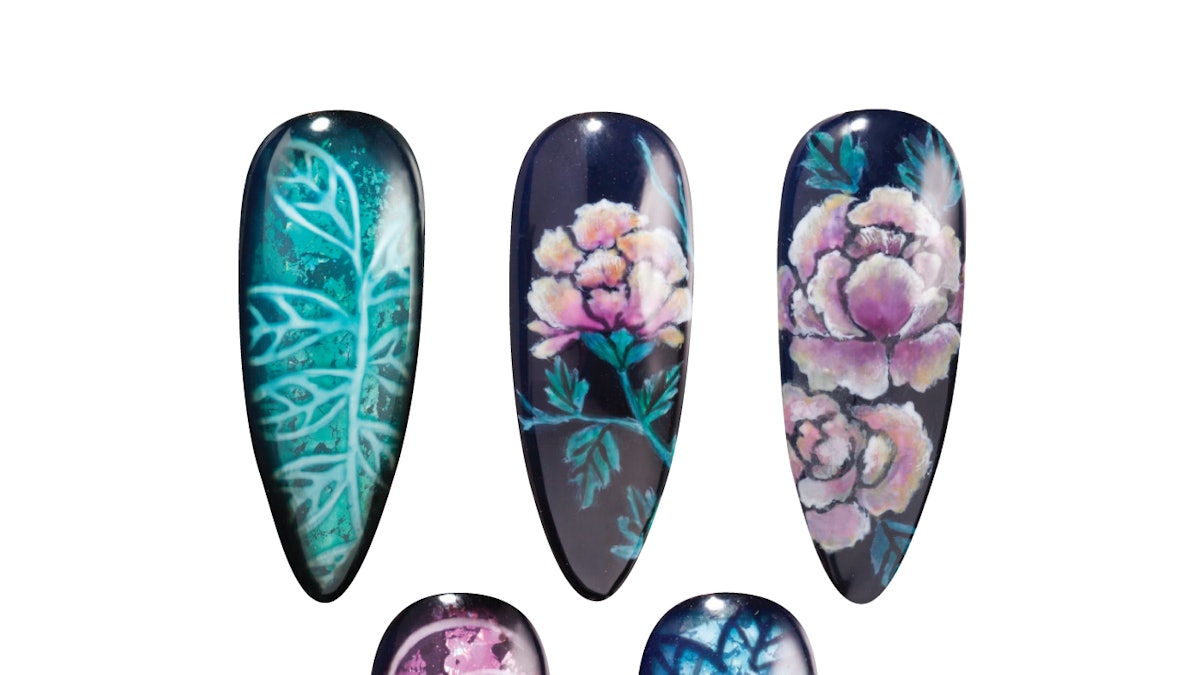
Winter is a season that brings its own unique beauty, and there’s no better way to celebrate it than through stunning nail art. In this Mani Monday feature, we focus on three captivating tutorials that showcase winter florals, bringing elegance and vibrancy to your cold-weather manicure. Nail artist Joey Lin from New York City shares her techniques for achieving mesmerizing floral designs using deep hues, perfect for the winter season.
Nailspiration Set 1: Deep Rose Elegance
This design combines a classic rose motif with a modern twist, ideal for making a statement during the winter months.
Supplies Needed:
- Gel base coat
- Black gel polish
- Purple gel polish
- White gel polish
- Holographic transfer foil
- Gel top coat
Steps:
-
Begin by applying a gel base coat to your nails for a smooth foundation. Next, apply one coat of black gel polish, ensuring to work meticulously for an even finish. Do not wipe away the tacky layer, as this helps the transfer foil adhere better.
-
Now, dab holographic transfer foil over the entire nail, covering it as uniformly as possible to create a stunning effect.
-
Using a detail brush, apply a thin layer of purple gel polish, then craft a large, beautiful rose in the center using white gel polish.
-
For added depth, apply a second thin layer of purple gel polish over the rose. Afterward, trace around the perimeter of the nail using black gel polish to define the design.
-
Complete the look by sealing your work with a gel top coat, ensuring your nail art is both beautiful and long-lasting.
Nailspiration Set 2: Floral Centerpiece
This design showcases a striking flower at the center, allowing for a pop of color against the dark backdrop of the black polish.
Supplies Needed:
- Gel base coat
- Black gel polish
- Purple gel polish
- White gel polish
- Green gel polish
- Holographic transfer foil
- Gel top coat
Steps:
-
Start with a gel base coat and apply one coat of black gel polish, similar to the first tutorial, keeping the tacky layer intact.
-
Once the black polish is set, carefully apply holographic transfer foil over the entire nail for a touch of glamour.
-
With a detail brush, paint a delicate flower in white gel polish right in the center of the nail, followed by the pistil and leaves using black gel polish.
-
Add a thin coat of purple gel polish to the flower, and continue by applying green gel polish to the leaves to bring the design to life.
-
To finish off, apply black gel polish to the edges of the nail for a refined finish, then seal with gel top coat.
Nailspiration Set 3: Layered Floral Fantasy
This final design introduces layered flowers, providing a more intricate and detailed approach to winter florals.
Supplies Needed:
- Gel base coat
- Black gel polish
- White gel polish
- Purple gel polish
- Green gel polish
- Gold gel polish
- Gel top coat
Steps:
-
As before, start with a gel base coat. Apply two coats of black gel polish for a rich, deep color.
-
Using a detail brush, paint a flower in white gel polish at the center of the nail.
-
Below the first flower, add a second white flower, and surround them with white leaves for a balanced look. Use purple gel polish for the centers of the petals, leaving the tips white for contrast.
-
Apply green gel polish to the leaves for a natural touch, and finish with gold gel polish on the edges of the petals, adding warmth to the design.
-
Seal your artwork with a gel top coat to ensure longevity and shine.
Conclusion
Winter florals are a perfect way to embrace the season’s beauty while maintaining a chic nail style. These three tutorials offer varied techniques and styles, allowing you to choose according to your preference. Whether you appreciate the classic rose, a striking centerpiece, or intricate layering, there’s something here for everyone.
Which one of these tutorials is your favorite? Let us know in the comments below!
[Photography by Jason Bennett]
This article was originally published in the January 2018 issue of NAILPRO.


